Odds are, you’ve heard of Scrivener, even if you haven’t tried it. You’ve probably also read the late Blake Snyder‘s classic guide for writers, SAVE THE CAT. RU’s tech wizard Pat Haggerty shares his unique perspective on the two at Romance University today.
Have you ever attended a class on writing theory or story structure and for whatever reason, the content meshed into your writers brain in that “Damn, I can’t wait to get out of here and put that to work” kind of way? Well that’s the way it was for me when I was at RWA Nationals earlier this year and went to the, Save the Cat! workshop taught by Jessica Brody. It was on the schedule at the same time as a couple of sessions I didn’t need and one that I didn’t want, and I really attended it just to have something to do before the workshop that came after.
Boy, was I pleasantly surprised. And that’s saying something, because I’m an organic writer (pantster) and usually I think of most writing techniques are like good fertilizer: you toss them into the mental mix to help your brain work as it forms the story, but you don’t bring them to the front of your mind or you’ll become too wrapped up in the details of the particular theory and lose the story.
Does that even make sense? I hope so.
Save the Cat! (STC) is mostly a story structure methodology pined by Blake Snyder and designed for screenwriters. Wait, did you just say screenwriters? Yes, I said screenwriters. It’s detailed in Blake’s book, Save the Cat and extended in his followup Save the Cat Strikes Back. Though designed with the screenwriter in mind, STC offers a myriad of excellent insights for anyone wanting to create a compelling story, written or visual.
Oh, did I mention that I’m a geek? Yea, I’m that friend that you’d call if your printer quit printing or you couldn’t get online. When my parish priest lost two years of pictures because he accidentally erased the only copy from the memory card in his camera (head-desk), he called me. You want to hear something funny, listen to phone message left by an 80yr old Irish Catholic priest named Mike regarding files accidentally deleted from the flash card for his camera.
So the night after Jessica gave her great STC workshop at RWA nationals, I went back to my room, fired up my Apple Air, and opened the best editor for writers I’ve ever seen: Scrivener. Then I wondered, “How can Scrivener help with save the cat?”
In STC you start with your logline; that one “What is it and what’s it about” sentence that sums up your whole story. Since you want to be able to review your logline at any point in your writing (even though it might change over time) a great place for it is in Scrivener’s “Project Notes” section. “Project Notes” sit at the bottom of the inspector pane on the right side of the Scrivener interface.
If you don’t see the inspector, open it by pressing the big I at the top right corner of your interface. At the bottom of the inspector are some buttons and the leftmost, when selected, will display the Notes section in the inspector. If the notes section reads, “Document Notes” click on the heading and select the Project Notes option.
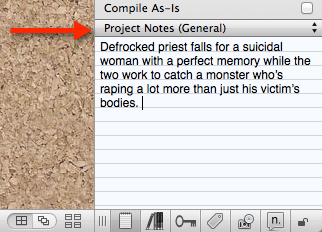
Note: That’s the logline for my WIP today. When I started a couple of months ago it read, “Man gives up the priesthood to find Gods greatest gift, love.” Needless to say, my story has changed a bit as it has evolved. That’s ok. As your focus changes, so does your logline.
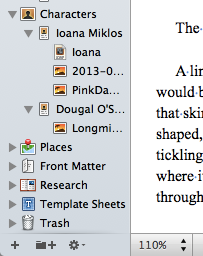
Once you know what you’re writing, even if it is from the 20,000ft view, you think a bit about whom your writing. What’s your protagonist like? Antagonist? Support characters? If you’re like me and you’re going to meet most of these people as the story evolves that’s fine, but even I have some idea about the key players before I start. Scrivener has a built in character sketch that you can use and you can modify its template any way you like to make it work best for you.
After the whom planning, it’s time to lay in the story structure. At its heart STC follows a three act, 15 beat layout that combines the best elements of character arc and plotting. The structure goes like this:
1. Opening image: This that first part of the first scene that grabs the reader and leaves them saying to themselves, “This is going to be good.” It might give us a glimpse of the hero or the setting but more than anything it makes the reader want to keep reading. This is Eve Dallas waking up from a dream that left her shaking just 6 hours after having killed a man or the Jack Reacher what opens with, “Suicide bombers are easy to spot. They give out all kinds of telltale signs.”
2. Setup: The setup continues the opening image and introduces us to the key players, showing us the way they are before the story sets out. It’s typically multiple scenes and shows us what needs fixing. This is Harry Potter living under the stairs and Eve Dallas heading into work after the bad night only to head right back out on another homicide. Katniss as she wakes up in the district and she and Gale sneak out to hunt.
3. Theme Stated: Somewhere in your setup you need a scene that states the theme of your story. This is what the hero really needs and it’s almost always dropped in through some secondary character. This is the heroine’s sister coming up behind her snarking, “You don’t need a man to make you happy girl.” Or when Gail suggests that they ditch it all and run away so they don’t have to live by the Capitol’s rules any more.
4. Catalyst: something changes. This is at most a single scene where you write your inciting incident; the thing that’s going to force the protagonist to either accept something terrible or make a real change. This is when Prim’s name is drawn for the games or when Hagrid shows up with Harry’s invitation to Hogwarts.
5. Debate: A handful of scenes where your lead character decided what’s going to happen now and are they going to accept the challenge or are they going to chicken out. This is Katniss getting ready to go to the games and Harry getting ready for school. It also ends Act I.
6. Break in 2 (starts Act 2): this is a single scene where the lead character, motivated by what he wants (not what he really needs), accepts the challenge and starts out towards the rest of the story and the change that it’s going to bring. This is Katniss at the Capitol getting ready for the games.
7. B Story: this is another single scene that introduces something to help the protagonist along the journey. It comes somewhere in the Fun and Games section (so not always right after the start of act 2). This might be the first hints of romance between the lead and the romantic interest. It could also be the introduction of a side kick of some kind. This is Harry meeting his friends on the train and Peeta when he confesses his love for Katniss in the interview.
8. Fun and Games: This is the hero moving along the path. It could be the romance forming or the hero fighting monsters. It’s the largest single section scene count wise and is going to make or break your book for the readers. This is Eve working on the murder and Katniss fighting in the games. Harry at school taking classes.
9. Midpoint: A single scene where something fairly major happens to change the direction of the hero’s path through the story. The hero for the first time sets out to find what he needs rather than what he wants. Typically this is a high or low point compared to what we’ve been moving through, but it might be very temporary. The stakes will be raised and the status quo broken. This could be the characters having sex for the first time or some big setback for the hero. This is Katniss disabled after being stung and she thinks she might die when when Peeta shows up. This is Eve and Roarke having their first sex in the target room.
10. Bad guys close in: This is a multiple scene section that tends to offset the midpoint. If it was a high, we are heading down and visa versa. While the things are getting worse (better) the hero realizes that something fundamental needs to change. This is Katniss getting over the venom and Rue working with her as a team. Things are looking up and going relatively well.
11. All is lost: A single scene where we hit yet another catalyst. This is where it looks like the hero has finally been defeated and that all is lost. This is Rue dying Katniss’ arms as Katiniss sings to her.
12. Dark night of the soul: For several scenes typically, the hero is lost and broken. He’s wallowing in what’s happened and is just before realizing that what he wanted all along isn’t what’s important after all. This is the moment just before the hero’s true evolution and change. This is Katniss decorating and burying Rue’s body. She receives a gift of bread from District 11 and thanks them. End Act II.
13. Break in 3: A single scene that starts Act III. The hero now knows what needs to be done and realizes that everything up to this point has happened so they could do what comes next. He knows what needs to be done and sets about doing it. This is Eve deciding to work with Roarke for real to solve the murder and the games keepers announcing that they would allow two winners in this years games.
14. Finale: A multi scene section (typically one of the largest behind Fun and Games) where the hero takes what he was in Act I, combines it with what he learned in Act II, and uses it to follow a true path to change. This is Katniss and Peeta or Roarke and Eve working together.
15. Final image: This is a final lingering scene showing what things have become. Our happy ever after glimpse. It may be effective if this is a mirror somehow of the opening image in beat 1. Katniss and Peeta joining hands on the train, Eve battered and bruised in Roarke’s arms, pressing a kiss to his throat and saying, “I’m glad you’re here. Be nice if you stuck around.” Then they both hope that there will be no dreams.
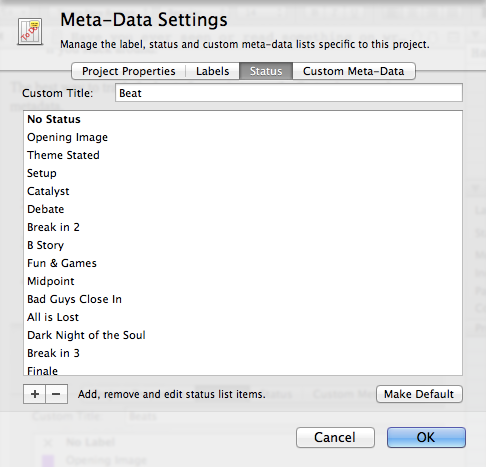
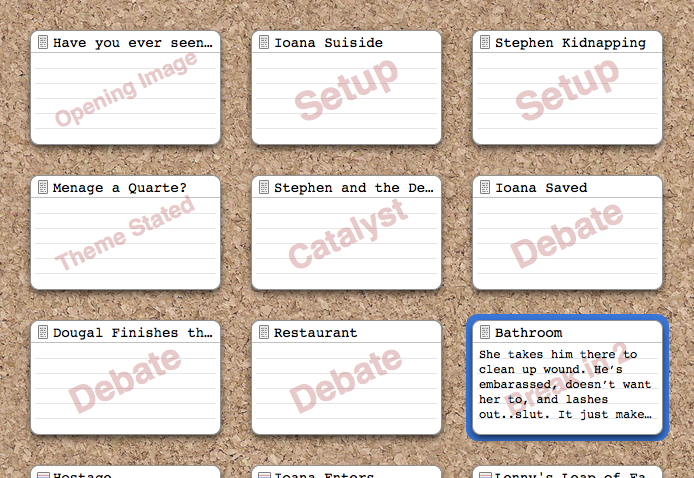
The best way to track the beats in Scrivener is to use the Status in general metadata part of the inspector.
Open the Inspector and in the central General section, open the menu next to Status and choose Edit.
Change the Custom Title to Beats.
Remove the existing labels by selecting them and hitting the minus.
Add in each of the 15 beats.
Now set the beat on each of your scenes/chapters/sections depending on what writing style you have when you use Scrivener. To best see your beats, switch to the corkboard and enable View | Corkboard Options | Show Stamps.
If you get into the whole STC thing and want to use it over and over again with Scrivener, read a bit on how to create a template in Scrivener and that will help a lot. That way you can set things up just once and use the general project over and over.
I think that’s about all I have for y’all this evening. Please feel free to post any questions you might have below and I’ll try my best to answer what I can. And please, make sure to pick up a real or electronic copy of Save the Cat and see all the nuggets that I didn’t have time to talk about today.
Cheers.
***
Have you tried Scrivener? How do you like it?
RU weapons expert ADAM FIRESTONE will be here Friday to discuss caliber designations.
***
Bio: After four years in the USMC, Patrick Haggerty studied Actuarial Science and Computers at Georgia State University. He has spent the past 15+ years developing and delivering technical training courses for Learning Tree International. On the side he has a successful consulting practice doing web application development for clients ranging from the United State Marines to Delta Airlines.
Seven years ago, stuck reading a mediocre book in yet another hotel, Patrick decided to try his hand at fiction. He may not be published, but these days you are much more likely to find him spending his evenings writing romance, than code. Patrick is an active member of RWA, RWAustralia, RW New Zealand, and is VP of Membership for Gulf Coast Romance Writers of America, and VP of OIRWA.